
The Dual Destiny mission is one of the many secrets that become inside the Pale Heart of the Traveler available after you’ve completed the main storyline of Destiny 2 The Final Shape.
Unlike most of the missions that you come across in the game, you can’t complete this mission solo, nor can you complete it with a Fireteam of three players. To complete the Dual Destiny mission, you’ll need to duo it, meaning a team of two players can run this mission at any given time.
So, how do you unlock the Dual Destiny mission, and how do you complete it in Destiny 2 The Final Shape?
How to unlock the Dual Destiny mission in Destiny 2
To unlock the Dual Destiny mission in Destiny 2, you need to complete the three Overthrow events in the three regions of the Pale Heart. The three regions are:
- The Landing
- The Blooming
- The Impasse
You’ll find three unique bosses in each of these areas, and when you defeat these bosses, you’ll see a message that says, “A Secret-Keeper of the Witch Queen” is near. The Secret-Keeper can be found in the following areas in the three regions:
- The Landing: In the cave near the Lost Sector
- The Blooming: Behind the fast travel point, in the labyrinth
- The Impasse: Near the Lost Sector symbol
You will have to find and defeat these three Secret-Keepers in all three areas, you’ll see a beam that shoots up in the sky. Follow this beam to a small cave. Head inside the cave and interact with Savathun’s statue to get the “Savathun’s Envoy” buff.

With the buff in hand, make your way to the two markers on your HUD. Defeat the enemies in these areas and two Subjugators will spawn. When you defeat them, they’ll drop an orb each. Pick up these orbs and come back to the cave and deposit them in their respective plates to spawn the banner in the middle.
You can interact with the banner to start the Dual Destiny mission in Destiny 2. So, how do you complete it?
How to complete the Dual Destiny mission in Destiny 2
The Dual Destiny mission is littered with puzzles that you and your teammate need to complete. To start the mission, you and your partner need to stand on the plates.
When you start on the plate, one player will receive a Light Aligned buff, while your partner will receive the Dark Aligned buff. When you have these buffs, you’ll see Pyramid splinters leading out of the cave to the other side.
Scale these and get to the other side as quickly as you can, and stand on the plates on the other side to lower the barrier to the next room. Inside this new room, you’ll find the first puzzle.
Destiny 2 Dual Destiny Symbol Puzzle 1 solution
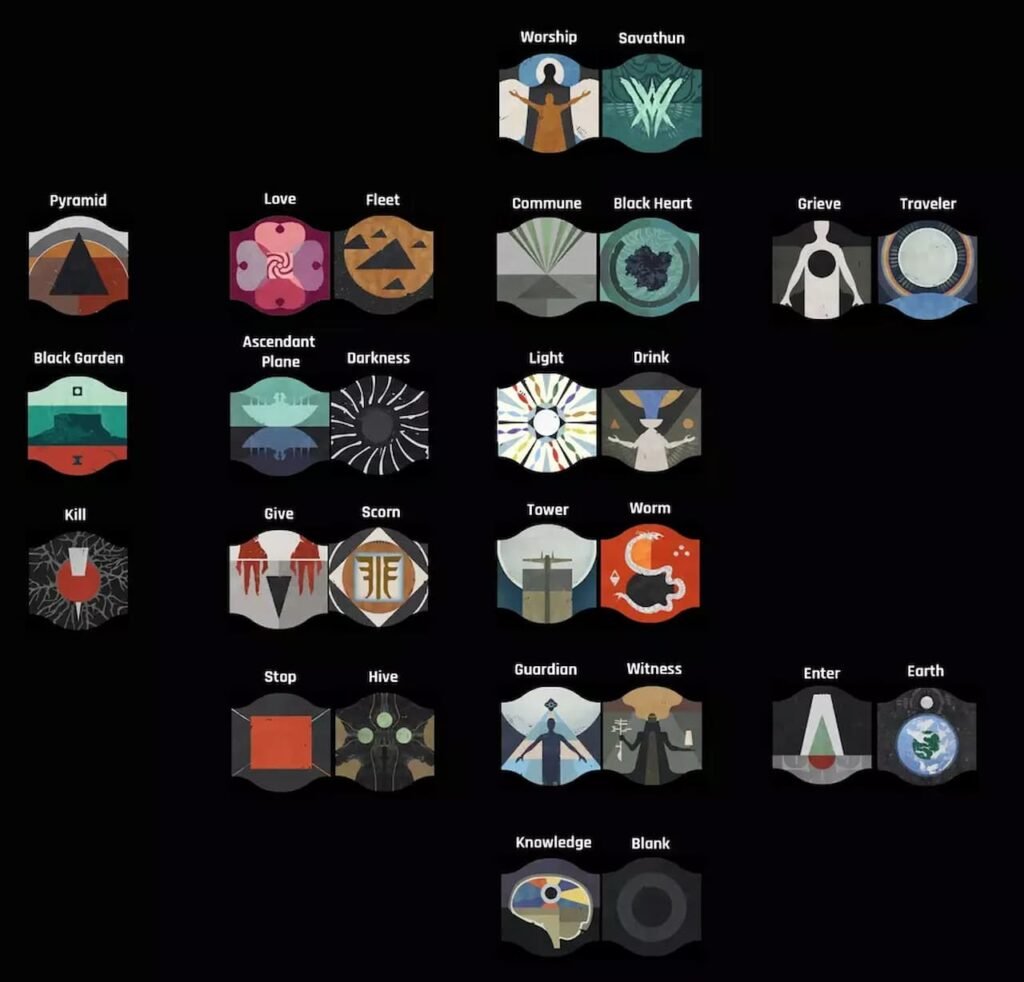
To solve this puzzle, one player will be able to see the symbols in air and will have to call it out, while the other player will have to shoot the splinters with the corresponding symbols.
For the first round, the Light buffed players will be able to see the symbols, while the Dark buffed players will have to shoot. This role will be reversed for the next round and then reversed again for the final round.
For each round that you progress, the number of splinters that you need to shoot will increase. You’ll need to shoot two splinters in the first round and four in the final round. The symbol callouts are similar to that ones that you saw in Vow of the Disciple Raid as seen in the image below:
However, before you can call out or shoot the symbols in the three rounds, you need to defeat enemies and get Servile enemies to spawn. Defeating them will cause these enemies to drop motes. Pick up the motes which correspond to the buff you have to start calling out and shooting the symbols.
Remember, for each round, the number of symbols that you need to call out will be equal to the number of motes you pick. So if you have to call out two symbols, pick two motes, and so on.
After this section, you’ll come across a platforming section once again, but be careful, because if you die here, you’ll lose time and this mission is a race against the clock.
Destiny 2 Dual Destiny Clock puzzle 1 solution
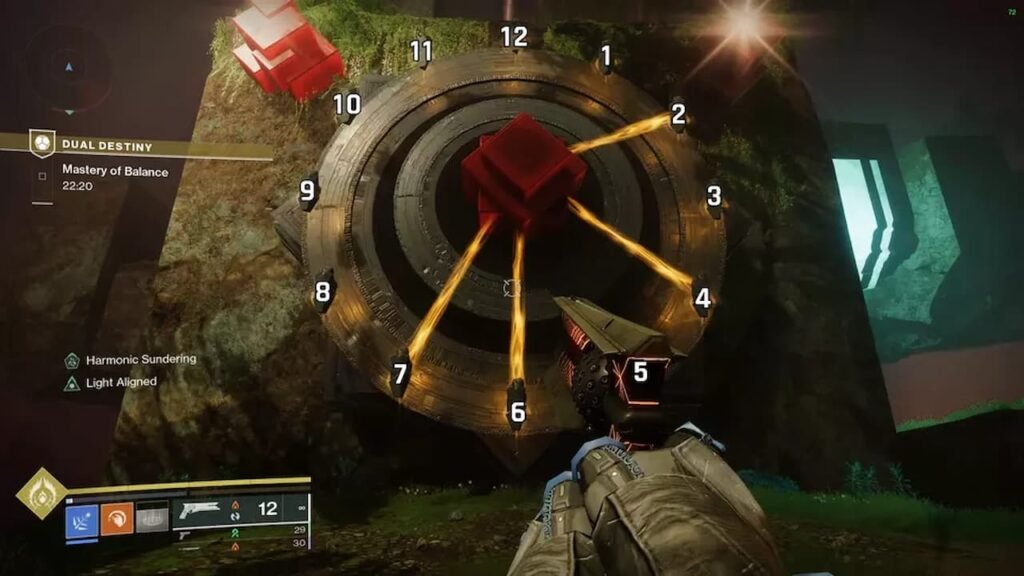
In this new room, you’ll see a lot of enemies which when defeated will spawn a Tormentor. You will have to defeat the Tormentor, but whoever gets the final blow will receive the “Harmonic Sundering” buff.
The entire puzzle setup looks like a clock, and the player with the “Harmonic Sundering” buff will be able to see the nodes of the clock that are connected. The player without the buff will need to call out the ones that are connected, and the player with the buff will have to shoot the ones that are called out.

Keep doing this till the obelisk disappears and the barrier is lowered.
The new room will present you with yet another Traversal puzzle. While there are a lot of branches that you can climb on, you will still have to defeat enemies to get some of the platforms to spawn.
Do this till you get to the final platform, where you will have to defeat two Tormentors to lower the barrier to the next room.
Destiny 2 Mastery of Balance Expector Selin and Expector Yemiq boss fight
The Mastery of Balance boss fight in the Dual Destiny mission in Destiny 2 The Final Shape is one of the most complex boss fights that the game has to offer. It’s broken into multiple stages, and each stage has a puzzle associated with it.
To start the fight, defeat the enemies and then deal damage to Expector Selin till it goes immune. When this happens, Servile enemies will spawn. Defeat the enemies and the player with the Light buff will see three symbols spawn in the middle of the room.
They’ll have to call these symbols out and the player with the Dark buff will have to shoot the one that matches the callout. This will remove Selin’s shield and you will be able to damage it again.
After you’ve removed around 33% of its health, Selin will retreat and Yemiq will step into the fight. Deal damage to Yemiq till you’ve removed about 1/3rd of its health to trigger the next puzzle.
The puzzle remains the same, but the roles will be reversed. This time the Dark buff player will be able to see the symbols in the center, while the Light buff player will have to shoot the ones with the matching callout.
Once you’ve shot these symbols correctly, Yemiq will be vulnerable again till you’ve removed around 1/3rd of its health bar. When you reach this point, Yemiq will retreat and you’ll be faced with a clock puzzle.
For this section of the puzzle, the two of you will see two clocks, with only four connectors reaching out to the splinters. One person needs to call out all the connections, and then the two of you need to shoot the connector that is common for both of you.
At any given point, only one connector will be common, but the connectors will change every few seconds so you need to be fast when it comes to shooting. You’ll have to do this thrice to solve the puzzle.
When you do this successfully, both Yemiq and Selin will spawn back in the arena in Destiny 2, and you will have to defeat them together. Once the boss is defeated, the two of you will drown in the deep and then spawn back inside a cage.
Here, you’ll be offered with a choice. We won’t tell you what it is, but no matter what you choose, the outcome will be the same. Following this, the mission will end and you will receive the Exotic Class Item, depending on the class you’re playing as.
After this, you can farm the Exotic Class Item in Destiny 2 The Final Shape either by completing the Dual Destiny mission or by opening chests within the Pale Heart of the Traveler.