
The Steam Deck is actually a full fledged computer packaged into a handheld form factor. Powering the Steam Deck is a custom x86-64 AMD CPU that runs on a Linux based operating system known as SteamOS.
In addition to running games, SteamOS can also switch to a desktop layout that should be very familiar to Windows users, and is a great way to get work done on the go, or when you are in a pinch.
The Steam Deck does require a few essential components to be truly desktop capable though, and we’ll be listing the entire setup below.
Everything You Need To Know About Using the Steam Deck As A Desktop PC
It’s certainly possible to use the Steam Deck without a dock, as its own miniature desktop PC. However, having access to accessories such as a dock and a portable monitor can change things dramatically for the better:
A USB-C Dock
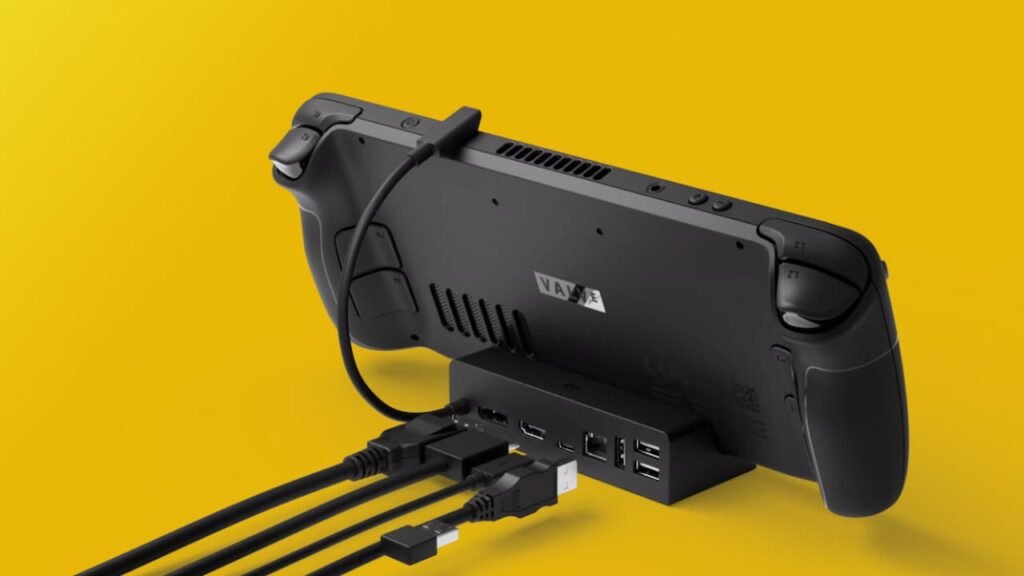
This is the main component for this setup. While Valve’s own Steam Deck dock offers a great (and clean!) way to prop up the handheld, along with ample connectivity, it is far from the cheapest or most functional option.
Ideally, any USB-C dock would do, just make sure it has enough expansion options available. You’d want an HDMI out port (preferably 2.0 or higher with 4K@60 Hz support), a few USB-A ports and a Type-C port for power passthrough (used to charge the device while working with it).
Once the dock has been secured, we can make our way to the rest of the setup.
Portable Monitor/Desktop Monitor
Of course, the Steam Deck’s own display is just too small to get any real work done. Using the dock, you can connect the Deck to a display and thereby making it into a full fledged desktop PC.
With the extra screen real estate, it is now possible to get a lot more work done efficiently, especially in Desktop Mode.
Desktop Mode is built on top of the KDE Plasma desktop environment, whose user interface and shortcuts should be easily recognizable for those used to Windows 10 and 11.
If you have a monitor with a USB-C cable input (that supports charging and has additional expansion ports on the monitor itself – acting like a hub), this would allow you to bypass the rest of the setup entirely, and connect the Deck with a singular USB-C cable.
Power Source

As far as power goes, try using a USB-C PD charger with at least 65 watts of power delivery output. Anything lower than 65 W could result in battery drain (with the Deck’s power consumption being unable to keep up with the charging speed).
Stick to known brands and look for ratings on Amazon and other popular sites before purchasing a USB-C charger.
Accessories

This list wouldn’t be complete without a few accessories:
- Logitech MX Anywhere 3 (Or any Bluetooth mouse really. Bluetooth is important here, since it frees up a slot on the dock).
- Any Bluetooth Keyboard (You can also use a USB-A dongle instead, which is entirely up to you).
- A USB-C to NVMe SSD adapter (used to store games, optional).
Obviously, the keyboard and mouse are your most important accessories here and are pretty vital to being able to use the Steam Deck as a computer.
If your keyboard and mouse support Bluetooth, you can just run a single cable from the monitor (assuming it has a Type-C input) to the Steam Deck, making your setup a lot more painless and clean.
With these components, it should now be possible to use the Steam Deck as a fully functional Linux desktop, for the most part.