
The Bow has one of the highest DPS uptimes out of all the weapons in Monster Hunter Wilds. Much of its playstyle revolves around constantly dodging incoming attacks and punishing monster openings to consistently chip away at their HP bar.
It’s one of the harder weapons to master in the RPG but has one of the more fun playstyles where you get to cosplay as Legolas from The Lord of the Rings. So if you are looking to master this weapon and make some of the best highest DPS builds around it then the guide below will help you out.
Best High Rank Bow builds in Monster Hunter Wilds
If you are reaching the endgame loop in high rank, here are some of the best Bow builds that you can look to make in Monster Hunter Wilds:
1) The Critical Element Bow build
| Part | Equipment Skills | Decos |
|---|---|---|
| Angelbain | – | Element/Critical Element (3x Element/3x Critical Element Critical III (3x Crit boost) Spread |
| Guardian Ebony Helm Beta | 2x Burst | Refresh (1x Stamina Surge) |
| Ark Vulkan Mail Beta | 1x Weakness Exploit | Chain (1x Burst) Refresh (1x Stamina Surge) |
| Guardian Arkveld Vambraces Beta | 2x Weakness Exploit | Physique (1x Constitution) Physique (1x Constitution) Physique (1x Constitution) |
| Gore Coils Beta | 2x Constitution 1x Gore Magala’s Tyranny | Chain (1x Burst) Refresh (1x Stamina Surge) |
| Gore Greaves Beta | 1x Antivirus 1x Flinch Free 1x Gore Magala’s Tyranny | Chain (1x Burst) Sane (1x Antivirus) Sane (1x Antivirus) |
| Weakness Exploit Charm 2 | 2x Weakness Exploit | – |
As the Artian weapons are the meta for Elemental Bows, you will be using the Angelbain variants for each of the elements in the game. With 5x Weakness Exploit and the affinity that you get from Gore Magala’s Tyranny and Antivirus, will let you have a very high crit chance on this build. You further maximize the damage of the weapon with Crit boost, Critical Element, and Spread.
For Artian Reinforcements try going for either 4x Attack with 1x Affinity or 4x Element with 1x Affinity. Attack and element are equally important for the bow so you can try and maximize either. However, as there is a lot of RnG involved with the Reinforce system you can just settle for a mix of the three stats.
You are further increasing your DPS with Burst which at level 5 will give you 10 RAW and 120 Element when you are meeting the 5 hit condition.
2) The Coalescence Tetrad Shot Bow build

| Part | Equipment Skills | Decos |
|---|---|---|
| Angelbain | – | Element/Precise (3x Element/1x Ballistics) Spread Jewel Bandolier/Precise (3x Tetrad Shot/ Ballistics) |
| Gore Helm Beta | 1x Gore Magala’s Tyranny 1x Scaling Prowess 1x Evade Window 1x Coalescence | Phoenix (1x Coalescence) Physique (1x Constitution) |
| Gore Mail Alpha | 1x Gore Magala’s Tyranny 1x Scaling Prowess 2x Evade Window 1x Antivirus | Phoenix (1x Coalescence) |
| Guardian Ebony Braces Beta | 1x Ebony Odogaron’s Power 1x Guardian’s Protection 1x Burst 1x Divine Blessing | Refresh (1x Stamina Surge) Physique (1x Constitution) |
| Gore Coil Alpha | 1x Gore Magala’s Tyranny 1x Scaling Prowess 2x Constitution 1x Antivirus | Chain (1x Burst) Physique (1x Constitution) |
| Gore Greaves Beta | 1x Gore Magala’s Tyranny 1x Flinch Free 1x Antivirus | Chain (1x Burst) Divine Blessing (1x Protection Divine Blessing (1x Protection) Note: You can swap out divine blessing for any other Deco here. |
| Chain Charm 2 | 2x Burst | – |
This build makes the most of the synergy between Gore Magala’s Tyranny, Antivirus, and Coalescence. It also makes the most of the new Tetrad Shot skill which significantly increases the affinity of coatings from the fourth shot and attack of the fourth and sixth shots. This build makes the most of the coatings that your bow comes with especially when you have Pierce, Power, or Close Range coating.
Moreover, the build also has 2 points of Ballistics which will improve the effective range of your Bow and its coatings, making it much easier to use Close Range coatings.
This build also relies on Burst, and if you want to make it a bit more durable you can slot in 2 Divine Blessing decos or exchange them for something that fits your playstyle.
3) The Partbreak Wound Exploit Bow build

| Part | Equipment Skills | Decos |
|---|---|---|
| Griefbringer Urstox | 2x Ballistics 1x Special Ammo Boost | Critical III (3x Crit boost) Spread Jewel Expert (1x Critical Eye) |
| Guardian Arkveld Helm Beta | 1x Guardian Arkvel’s Vitality 1x Flayer 1x Partbreak | Refresh (1x Stamina Surge) (This is a Level 3 Slot where we chose to go with some Stamina Surge) Expert (1x Critical Eye) |
| Guardian Arkveld Mail Alpha | 1x Guardian Arkvel’s Vitality 2x Flayer 2x Blight Resistance | – |
| Guardian Arkveld Vambraces Beta | 1x Guardian Arkvel’s Vitality 2x Weakness Exploit | Physique (1x Constitution) Physique (1x Constitution) Physique (1x Constitution) |
| Guardian Arkveld Coil Beta | 1x Guardian Arkvel’s Vitality 2x Flayer | Destroyer (1x Partbreak) Expert (1x Critical Eye) |
| Guardian Arkveld Greaves Beta | 1x Guardian Arkvel’s Vitality 1x Weakness Exploit 1x Elemental Absorption | Destroyer (1x Partbreak) Expert (1x Critical Eye) |
| Weakness Exploit Charm 2 | 2x Weakness Exploit | – |
The Griefbringer Urstox which is a Guardian Doshaguma weapon is currently the best Raw Bow in Monster Hunter Wilds. Which is why it’s going to be one of your best choices for a Partbreaker build.
The Build relies entirely on the Guardian Arkveld set where you get 5 points of Flayer making it significantly easier to create wounds on monsts. Now coupled with 3 points of Partbreaker, you will be doing 30% more damage when destroying a Wound.
The Bow is amazing at creating and destroying multiple wounds on the monster and with this build, you will be getting your hands on considerably more monster parts every hunt. You can then use these extra monster parts to forge Reinforcement materials for your Artian Weapons or Armor Spheres for your armor.
As the Griefbringer Urstox comes with -15% affinity, you will try to offset that as much as possible with Critical Eye and Weakness Exploit and then further boost your damage with Critical Boost. This build also goes well with Peak Performance because of the passive healing that you get from the Guardian Arkvel’s Vitality every time you break a Wound.
4) The Dragon Piercer build

| Part | Equipment Skills | Decos |
|---|---|---|
| Griefbringer Urstox | 2x Ballistics 1x Special Ammo Boost | Pierce Jewel Critical III (3x Crit boost) Trueshot Jewel (1x Special Ammo Boost) |
| Gore Helm Beta | 1x Gore Magala’s Tyranny 1x Scaling Prowess 1x Evade Window 1x Coalescence | Challenger Jewel (1x Agitator) Sane (1x Antivirus) |
| Ark Vulkan Mail Beta | 1x Weakness Exploit | Challenger Jewel (1x Agitator) Refresh (1x Stamina Surge) |
| Guardian Arkveld Vambraces Beta | 1x Guardian Arkvel’s Vitality 2x Weakness Exploit | Sane (1x Antivirus) Physique (1x Constitution) Physique (1x Constitution) Physique (1x Constitution) |
| Gore Coil Alpha | 1x Gore Magala’s Tyranny 1x Scaling Prowess 2x Constitution 1x Antivirus | Challenger Jewel (1x Agitator) Physique (1x Constitution) |
| Dahaad Shardgreaves Beta | 2x Agitator | Refresh (1x Stamina Surge) |
| Weakness Exploit Charm 2 | 2x Weakness Exploit | – |
This is a Dragon Piercer build that solely relies on this particular bow move in Monster Hunter Wilds. You will be using the Griefbringer Urstox again for its really high RAW along with the Corrupted Mantle for the 20% affinity.
Under the right conditions with the Gore passive and Agitator active you should be getting a critical chance of about 75% with this build. It’s one of the best setups for taking out bigger monsters like Gore Magala, Uth Duna, Rey Dau, and Arkveld from a screen away.
It’s ideal to pilot the build in a party where the monster won’t keep focusing on you and your chances of carting just because you were stuck in DP animation will go down significantly. However, if you are playing it solo, make sure to bring your cat or call in the Support Hunters if the monster is getting a bit too aggressive.
What to eat for Bow builds in Monster Hunter Wilds?
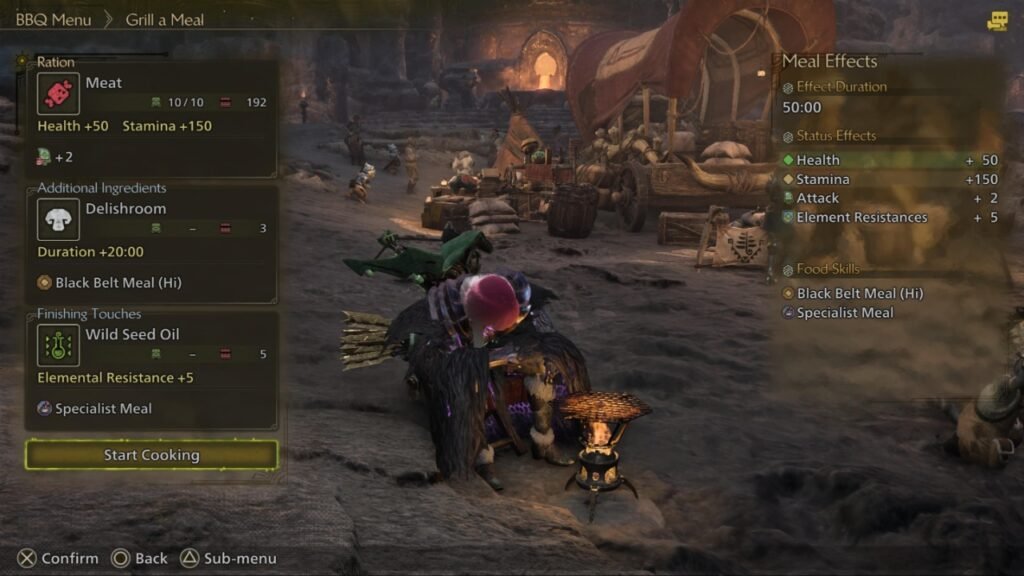
When it comes to meals you will need to add meat as the Ration for the additional Attack boost. Now for Additional Ingredients, it’s ideal to either go for Black Belt Meal (Hi) if you are struggling with Stamina Management, or Tumbler Meal (Hi) if you need more i-Frames while dodging and dash dancing.
For Finishing Touches, anything goes. This part of your meal will be situational so pick the one that fits the monster you are about to tackle.