
If you are new to the Monster Hunter Stories franchise, you will notice that the combat system in the games is quite unique compared to other turn-based RPGs of its type.
It follows a Rock-Paper-Scissors format, which Stories 3 further develops on by adding more flexibility.
Combat can feel a bit challenging at first, but once you get more familiar with each monstie’s attack patterns, you will start finding it to be one of the most rewarding experiences in the game.
How to master combat in Monster Hunter Stories 3
1) Attack Types
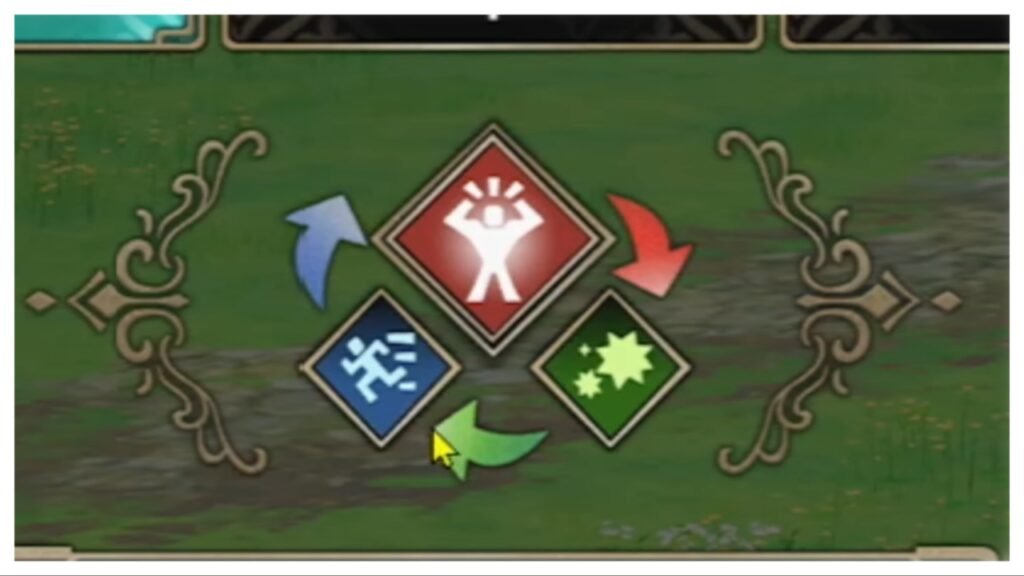
There are three Attack Types in Monster Hunter Stories 3: Power, Technical, and Speed.
This is where the Rock-Paper-Scissors system comes in as Power beats Technical, Technical Beats Speed, and Speed beats Power.
So if you are using a Speed attack against a monstie that’s using a Technical attack, then you will win the head-to-head during that turn.
Winning head-to-heads come with their own benefits, with the most important ones being:
- Doing more damage to the monster.
- Charging up the Kinship Gauge faster
Based on the weapon that you are using, winning a head-to-head can also grant you certain bonuses. For example, if you are using a Hunting Horn, you receive a Rainbow note for winning a head-to-head, which will then let you use certain special attacks.
2) Make the most of the Monstiepedia
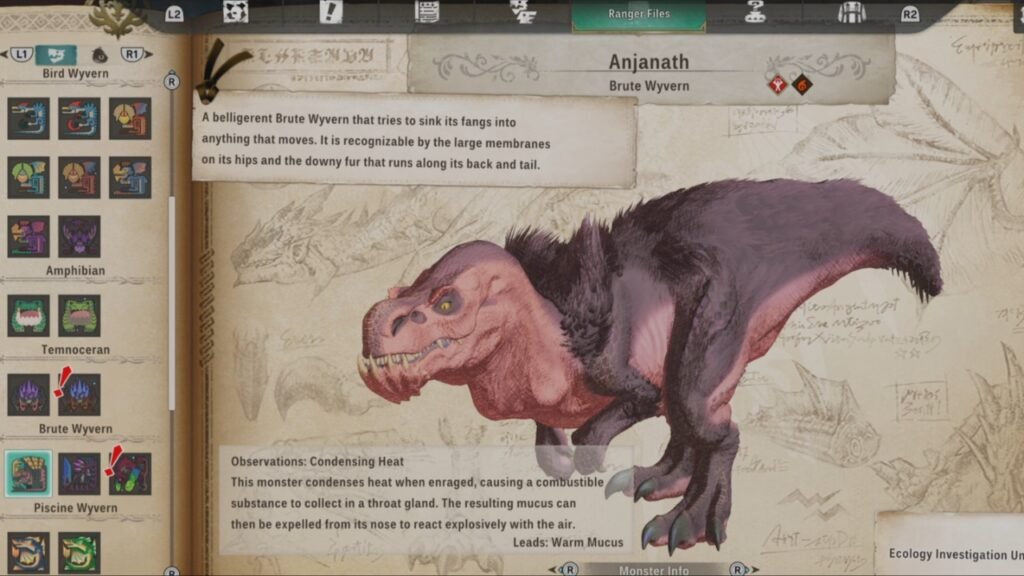
The Ranger Files has a detailed list of all the monsters that you have faced and hatched in Stories 3. It also shows the attack types that they usually use at the start of an encounter.
You will notice in the image above that Anjanath likes to start with Power attacks. So if the monster is aiming at you, then you can win out the head-to-head with a Speed attack.
However, do keep in mind that monsters cycle through different states. A normal monster will go from a normal state to being enraged, which will change the nature of their attacks. Feral monsters, on the other hand, go into a Feral state, which will also change the type of attacks that they do.
Anjanath, for example, goes from using Power moves to Technical moves once enranged. A Feral Nerscylla will start with Technical and then use Speed.
Apart from the attack types, there are also Neutral attacks marked in Yellow. These do not have type and cannot be countered. The best way to avoid them will be to dodge the attack.
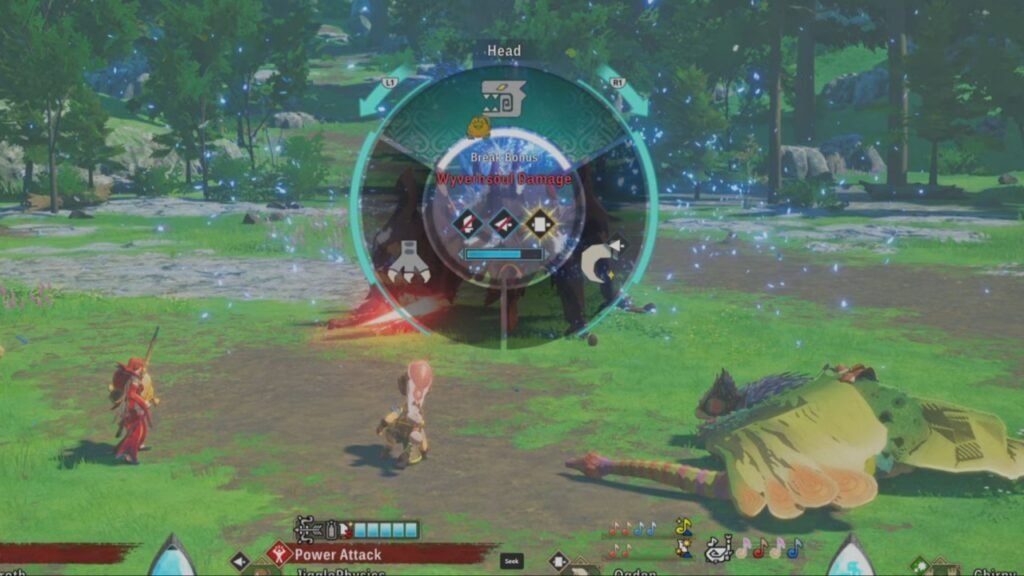
3) Double Attacks and Kinship
If you and your monstie are winning a head-to-head while attacking the same monster part, then it will lead to a Double Attack. This does even more damage to the monster, greatly fills up your Kinship Gauge, and even interrupts the monster’s attacks, allowing you to get a free turn.
However, do keep in mind that double attacks only occur when your Ranger is using a basic attack and not a skill.
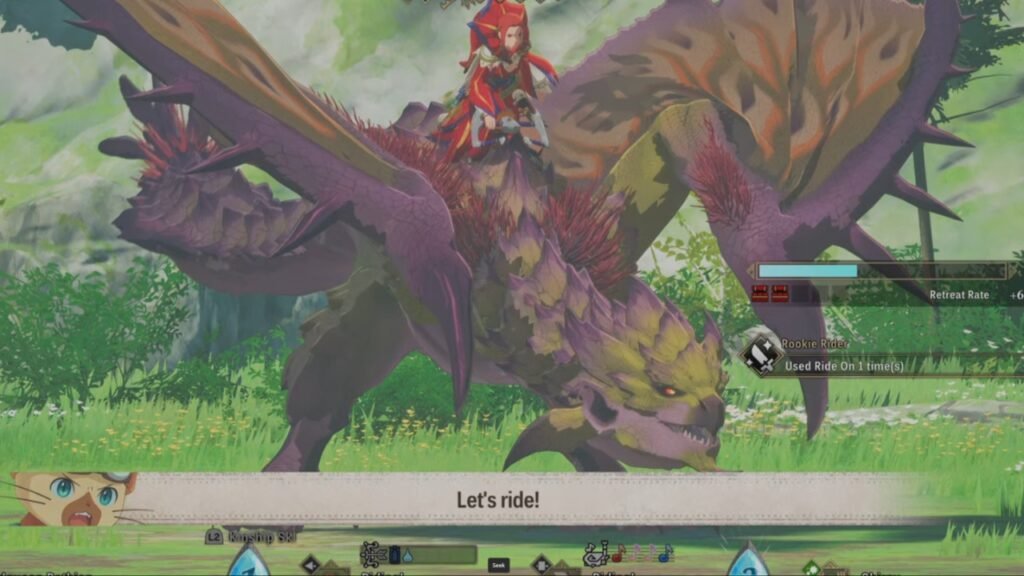
Once the Kinship meter fills up, you can then ride your monstie. This will completely heal your Ranger and the monstie, while shedding all negative or abnormal status effects.
So make sure you are using this system tactically, and not jumping on your monstie as soon as the gauge fills up.
Moreover, your Kinship Level can be raised while riding a monstie and performing moves with it. The higher the Kinship level, the more your Attack, Defense, Wyvernfell Power, and Kinship Skill power.
So if possible, hold out on using your Kinship or Double Kinship Skill till you are maxing out the gauge to level 3.
Additionally, while ridding your monstie, your basic attacks will become capable of damaging the enemy’s Wyvernsoul Gauges. Depleting Wyvernsoul flinches and topples the monster, allowing you to get free hits in. So much of your combat strategy against harder enemies will be to keep depleting this bar as soon as possible.
4) A Synchro Ruch isn’t always the best option

When you topple a monster, you will get the option to perform a Synchro Rush on it. While the move does deal a massive amount of damage, it might not be the best strategy to use when up against a difficult encounter.
When a monster topples, you sort of get a free turn to do whatever you want. So you can look to heal your party members at this time, set up traps, or try to inflict a status effect.
Apart from this, any attack that you land on a toppled monster will be a critical strike. So you can concentrate on breaking a certain part to make the most of this downtime.
Breaking a monster’s part makes it significantly weaker. So try not to instantly go for a Synchro Rush and weigh your options once the monster topples.
5) Monstie Swaps and Status Menu
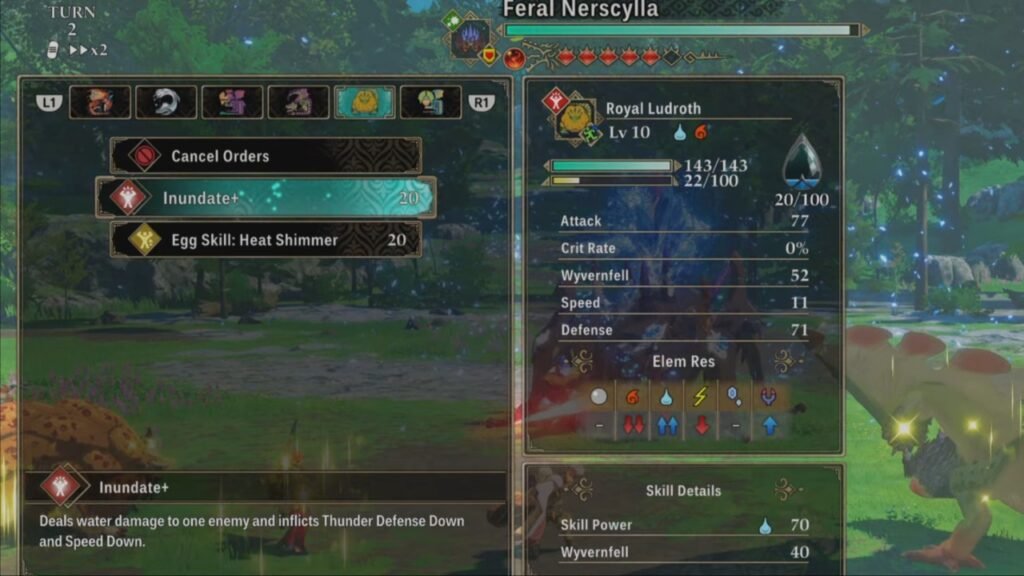
The monster swapping mechanic plays a key role in making encounters much more manageable in Stories 3. Some monstie skills complement each other quite a bit.
For example, a Royale Ludroth’s Inundate+ skills apply Speed Down and Thunder Defense down on the enemy. You can then pair this with a Tobi-Kadachi whose electric moves are now going to deal even more damage to the monster.
Swapping monster also lets you keep winning out on head-to-heads. As each monster has an attack type they prefer, having a roster of Monsties with different types lets you get off more Double Attacks.
Apart from the Monstie Swap mechanic, another thing that you will want to make the most of is the Status Menu. Use this during encounters to see the buffs, debuffs, and status ailments that your party or the enemy monster has.
You can also see other stats represented on the screen, like the elements that everyone is weak to or strong against. This is helpful in coming up with a strategy.
6) Damage types and monster weakness
Apart from the attack types, you also have three damage types in Monster Hunter Stories 3. These are your Pierce, Blunt, and Slashing. Each weapon type and skill does a particular type of damage, and every monster part takes more damage from a particular damage type.
The Feral Nerscylla, for example, will take more Blunt damage on the head, while its claws and feet will take more damage from Pierce and Slashing, respectively. Swapping between the weapon types will allow you to get part breaks more easily.
A part break will cancel the monster’s action for that turn; it can topple the monster, cause a transformation to occur, weaken some of their skill, and allow you to do more damage to the broken part.
Moreover, monsters also have elemental weaknesses that you can exploit. Each monster is strong and weak against particular elements, and they will take more damage from attacks of that element.
Anjanath, for example, has a weakness to both Ice and Water. So monsties like the Royal Ludroth and weapons like the Spongia bow are amazing choices against it.
7) Understanding Skill Affinities
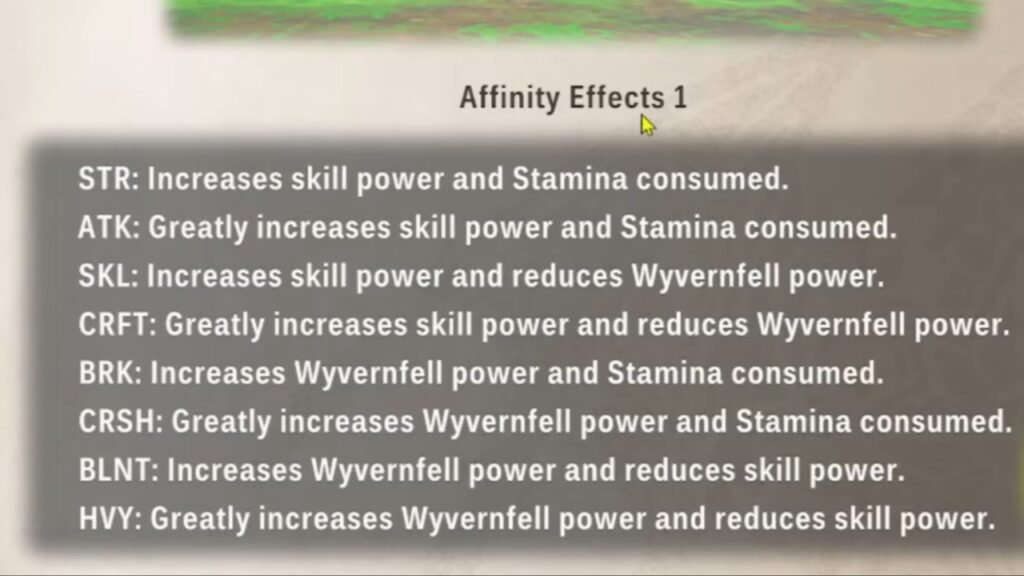
Monster Hunter Stories 3 has a system called Skill Affinities that lets your attacks have additional properties. Here is a list of all the affinities that are currently there in the game:
| Skill Affinity | Effect |
|---|---|
| STR | Increases Skill Power and Stamina Consumed. |
| ATK | Greatly increases skill power and Stamina consumed. |
| SKL | Increases skill power and reduces Wyvernfell power. |
| CRFT | Greatly increases skill power and reduces Wyvernfell power. |
| BRK | Increases Wyvernfell power and Stamina consumed. |
| CRSH | Greatly increases Wyvernfell power and Stamina consumed. |
| BLNT | Increases Wyvernfell power and reduces skill power. |
| HVY | Greatly increases Wyvernfell power and reduces skill power. |
| STAB | Increases Crit Rate and Stamina consumed |
| FLSH | Greatly increases Crit Rate and Stamina consumed |
| XPRT | Reduces Stamina consumed and skill power. |
| TLNT | Greadly reduces Stamina consumed and skill power. |
| LONG | Increases effect duration and Stamina consumed. |
| ARC | Greatly increases effect duration and Stamina consumed. |
| CURE | Increases HP recovery and Stamina consumed. |
| HEAL | Greatly increases HP recovery and Stamina Consumed |
8) Making the most of Abnormal Status Effects
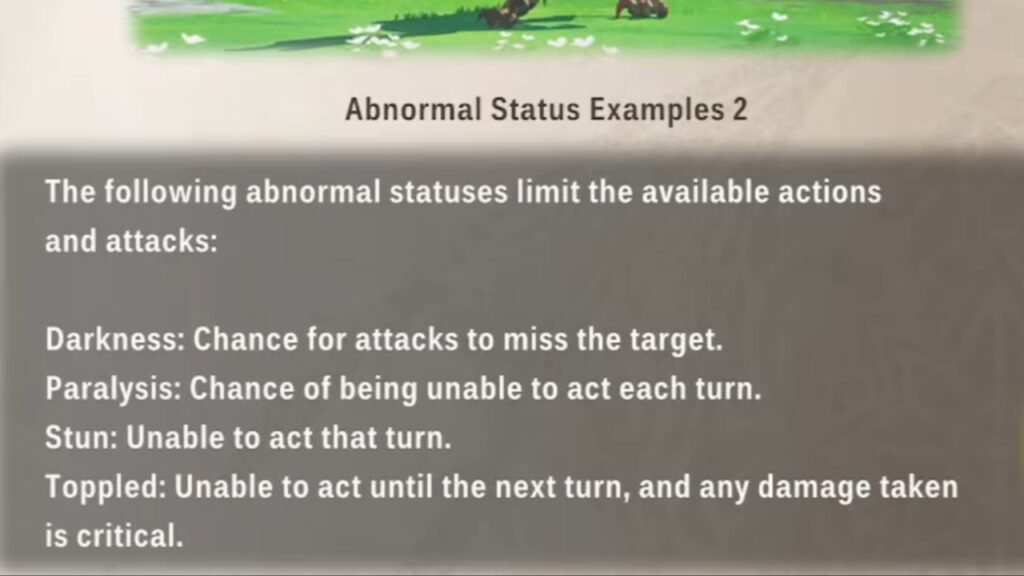
Making the most of the various abnormal status effects is a great way of turning the tide of battle. These effects apply to both enemy monsters and your party, and can be cured by either riding your monstie or using an item.
Here are the different types of abnormal status effects that you will find in Monster Hunter Stories 3:
| Abnormal Status | Effect | Applicable on |
|---|---|---|
| Burn | Reduces HP every turn and increases damage taken. | Affects both enemy and ally. |
| Poison | Reduces HP every turn. Potency depends on the type of poison. Noxious and Severe Poison do more tick damage. | Affects both enemy and ally. |
| Darkness | Chance for attacks to miss the target | Affects both enemy and ally. |
| Paralysis | Chance of being unable to act each turn. | Affects both enemy and ally. |
| Stun | Unable to act that turn | Affects both enemy and ally. |
| Toppled | Unable to act until the next turn, and any damage taken is critical. | Affects the enemy only. |
| Blastblight | Inflicts damage after a certain number of turns. | Affects both enemy and ally. |
| Bleeding | Increases damage taken by attacks. Removed after taking damage once. | Affects both enemy and ally. |
| Sleep | Unable to act, and any damage taken is critical. Removed after damage is taken | Affects both enemy and ally. |
| Skillseal | Unable to use Active Skills | Affects allies only. |
| Exhaust | Reduces Stamina recovered each turn by half. | Affects allies only |
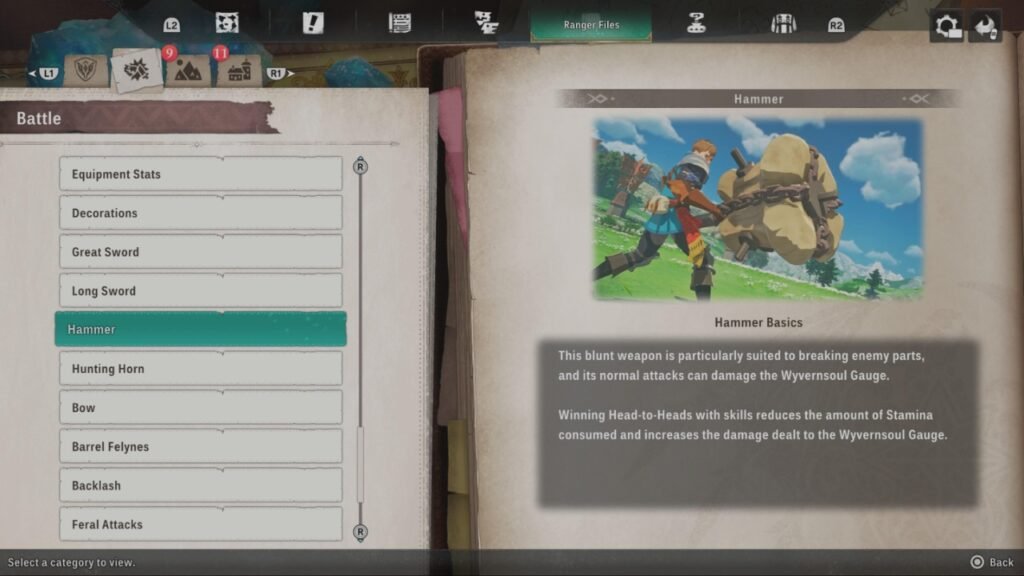
9) Understanding the different weapontypes
Apart from the damage types, each weapon is also very unique and excels at particular things during combat:
- Bows: Bows are all about weakening the enemy through debuffs and abnormal status effects. It excels at maintaining the tempo of a fight.
- Hammer: It’s a blunt weapon whose normal attacks also deal Wyvernsoul Gauge damage. It excels at breaking monster parts.
- Greatsword and Long Sword: These slashing weapons deal a ton of damage once you fill up their gauges. There are different conditions for filling up their gauges, and once you do, you get access to very powerful attacks.
- Hunting Horn: This blunt weapon is extremely potent as a support tool. It allows your Ranger to play notes, which you can then string up into songs, providing party-wide buffs. They are amazing at keeping your party healthy during the longer encounters.
- Gunlance: It’s a piercing weapon that maximizes both offense and defense. You will use Shelling Skill and other skills to deal damage and draw enemy attacks. Your Ammo gauge will start fully loaded and deplete when using Shelling Skills. It’s one of the most versatile weapon in Stories 3.
As you can only carry three weapons at a time, it’s best to have a fair bit of build diversity and invest in different weapon types. This lets you be very flexible with your approach.
10) Don’t sleep on Habitat Restoration
Habitat Restoration is very important for unlocking rare monster variants as well as getting your hands on S-tier monsties. One of the earliest restorations you will be tasked with is of the Rathian in the Sunpetal Plains.
Once you hatch and release Rathians into the wild, you will first unlock their Pink Rathian variant and then the Dreadqueen Rathian variant, which is one of the best early game monsters.
Now, once you start hatching and releasing Dreadqueen Rathian eggs, you will take its habitat restoration to S and unlock its incredibly potent egg varieties. These eggs will give you S-tier Dreadqueen Rathians with S-tier mutations on their Bingo.
So when it comes to making a powerful roster of Monsties, don’t sleep on Habitat Restoration and make sure you are getting S-ranks of monsters that you actually want to have in your party.
11) Collect those Poogies
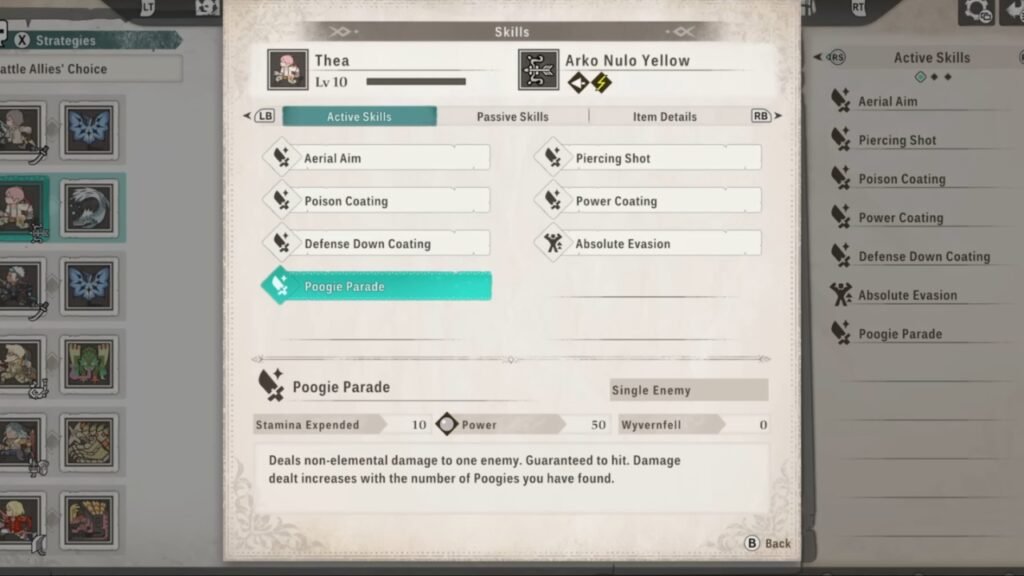
Poogies can be found all over the map. Aside from being a fun collectible in the game, they have a fair bit of input in combat when you are using Battle Ally Thea in your party.
She has a skill called Poogie Parade, which does non-elemental damage to one enemy. It’s guaranteed to hit, and the damage the move deals is based on the number of Poogie’s that you have found in the wild.
So if you are using Thea in your party, make sure you are actively looking for all the Poogies around the map.