
Rennala is a Legend Boss in Elden Ring and you will encounter her in the Academy of Raya Lucaria. The Queen of the Full Moon is an optional encounter for completing the narrative. However, you will not be able to unlock character respec if you don’t beat the Red Wolf of Radagon and then her in the legacy dungeon.
So if you are looking to try out new builds as you make your way through the RPG, then you will need to beat her. Once defeated, Rennala will unlock the Rebirth mechanic. This will let you respec your character as many times as you want as long as you have Larval Tears.
Renalla can be challenging based on your build. She has high resistance to magic and all the other elements making it a tough encounter for mages. She also has two phases, and in Phase Two she can summon a Troll Knight, a Bloodhound Knight, Lone Wolves, or even a Dragon.
Contents:
- Rennala boss overview
- Rennala location
- Rennala movesets and counters
- Rennala resistances and weaknesses
- How to beat Rennala
Rennala Queen of the Full Moon boss fight overview
Location:
- Academy of Raya Lucaria
Optional:
- No (If you are going for linear progression and want to unlock Rebirth or get The Age of the Stars ending)
- Yes (You only need to beat two Shardbearers to get into Lyndell. This makes Rennala optional)
Summons:
- Other Players
- Spirit Ashes
Boss Drops:
- Drops 30,000 Runes
- Remembrance of the Full Moon Queen
- Great Rune of the Unborn
- Rebirth (the ability to respec using Larval Tears)
Weakness:
- Slash Attacks
- Pierce Attacks
- Jumping Attacks
- Heavy Attacks
Resistances:
- Magic
- Fire
- Lightning
- Holy
Rennala’s resistance to magic and other forms of elemental damage makes her Phase Two a bit more challenging for mages. Melee users will not have much to worry about in the fight. As long as you are dodging her spells, you will have good DPS uptime.
The Queen of the Full Moon can be easily staggered with jumping attacks and heavy attacks. Heavier weapons can break her poise with a few hits, leaving her open to a Ripost.
Rennala has an array of spells that hit really hard. Her Full Moon is the most dangerous spell up her sleeve and can one-shot you based on the amount of HP you have left. Her summons can also be annoying to deal with, however, the trick to the fight is to ignore them (even if it’s the Dragon) and just focus on her.
Once defeated Rennala will drop 30,000 Runes, the Remembrance of the Full Moon Queen, and the Great Rune of the Unborn. She will also unlock th Rebirth mechanic, which will let you respec your character by using Larval Tears.
Where to find the Rennala in Elden Ring?
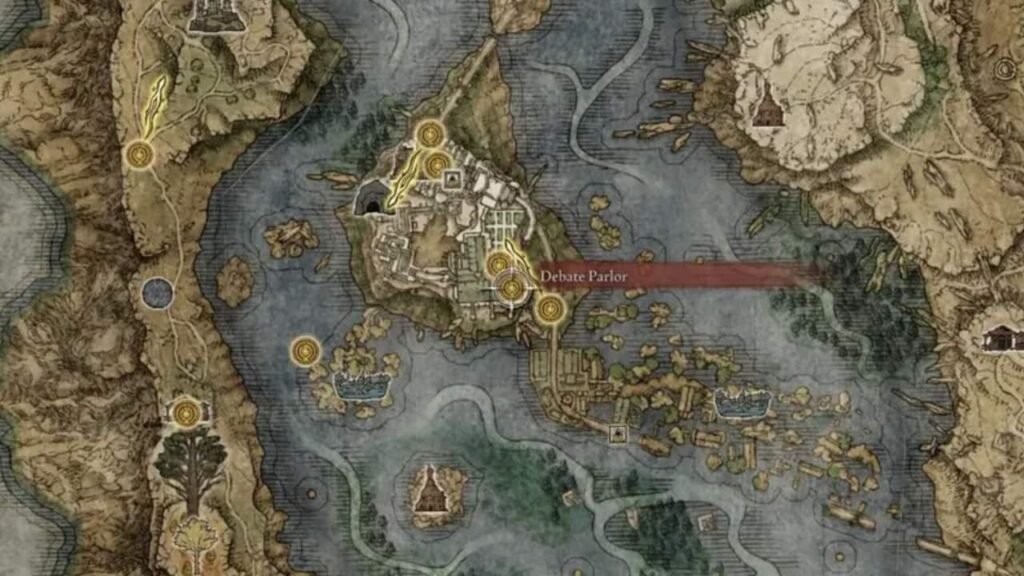
To reach Rennala in FromSoftware’s RPG you will first need to beat the Red Wolf of Radagon to unlock the Debate Parlor Site of Grace. From there you will need to head out and take the bridge to the right (be careful with the jump).
Go past the giant metal ball that will spawn on the bridge and roll toward you. Then enter the building and head to the other side which will have an open area and a lift guarded by a Carian Knight (special encounter).
Beat the Knight, activate the lift, and ride up. You will not be facing a shut door, so interact with it, and once it’s open the Rennala encounter will begin in Elden Ring.
You don’t have to worry about making the entire run again if you die in the fight. There is a Statue of Marika right before the door, and you can just respawn there.
Rennala phases, movesets, and counters in Elden Ring
Rennala has two phases but she is not the only one that attacks dueing both of them. In Phase One she will be accompanied by other Juvenile Scholars who will headbut you and even start throwing books at you.
In Phase Two she will often rely on her summon and will weave in spells while thy keep attacking you.
Here are some of the moves that you can face when encountering Renala in Elden Ring
Phase One

Light Explosion
- Move: When lying on the ground she will continually charge the light in her hand. Once it’s charged she will release it in a small area around her, dealing damage and recreating her bubble.
- Counter: Dodge away from her as soon as you see her hand filling up with light.
Chandelier Drop
- Move: Rennala will randomly drop a chandelier. A circle on the floor will be highlighted with flames, that where she will drop it. It deals a lot of damage.
- Counter: Make sure to spot the circles and not walk into them.
Gravestones
- Move: She will choose a random Juvenile Scholar and transform them into a glowing gravestone. She will then hurl them at you doing a fair bit of damage. She only does this move if her shield has been broken once.
- Counter: Just keep moving as you search for the glowing Scholars who are powering her shield.
Juvenile Scholar movesets

Fire Breath
- Move: They will raise their candle and blow out a short stream of fire.
- Counter: Just run away from the stream
Headbutt
- Move: If you are close enough the Apprentice will ram their head into you.
- Counter: Just keep moving and not standing infront of a Scholar for long.
Flying Book
- Move: A scholar will alleviate aa book and then send them flying at you.
- Counter: Just dodge through the incoming book
Flying Globe:
- Move: Instead of books, they will throw globes at you. However, this deals a lot more damage.
- Counter: Make sure to keep dodging and moving to avoid them.
Phase Two
Comet Azur
- Move: She will charge her staff for a while and shoot a beam of energy at you. Can do a devastating amount of damage if you are hit by it.
- Counter: The move is pretty easy to avoid if you keep running into her in a circle. Make sure to maintain a 45° angle so that you can close the gap. The move has a pretty long recovery time, so you will be able to get a fair bit of DPS uptime.
Star Shower
- Move: Rennala swings her staff in an arc to make magical stars. After a brief delay, these stars will fly at the player doing a fair bit of damage.
- Counter: You can run at any side to avoid the star, or just roll through them.
Glintstone Cometshard
- Move: She does this move while levitating. She will use her staff to shoot a single (but large) projectile at the player.
- Counter: The projectile is fast and does a lot of damage. Just roll forward to avoid it.
Shattering Crystal
- Move: Makes an energy crystal and then breaks it. This sends out shards in a large area infront of her.
- Counter: You will need to roll forward to the shards.
Glintstone Pebbles
- Move: Creates a line of energy crystals and after a brief delay they are shot at the player.
- Counter: Run in any direction or just roll through it to avoid it.
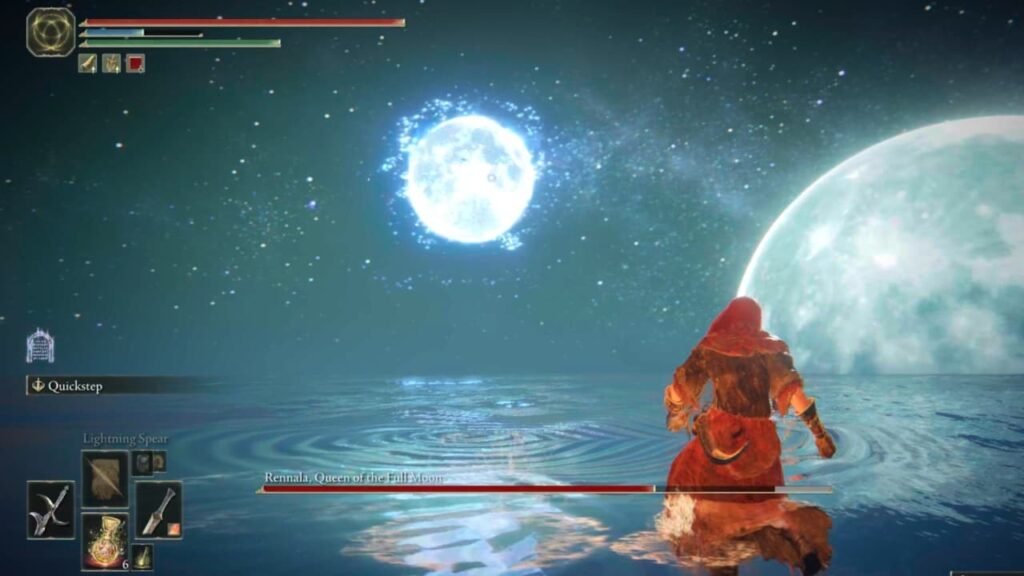
Full Moon (Rennala’s Version)
- Move: One of the highest damage spells in her kit. Rennala will curl up and turn into a full moon. This will dispel all the magic you throw at her. She will then leave the moon and send it floating toward you. It will explode in a large radius once it touches the water.
- Counter: Run away as soon as you see her charging the spell. Dodge away from the ripples to avoid the blast.
Twirling Toss
- Move: Rennala throws her staff out. It will spin in place for some time dealing damage before returning.
- Counter: Roll forward to get some hits in. Do not overcommit as the staff will return and catch you. So roll again after a hit or two.
Staff Twirling Spiral
- Move: Renal will once again throw her staff. But this time it will make spiral around her. Has a good attack radius.
- Counter: The counter for this too will be toll forward. You will have enough room to get some hits in during the attack animation.
Twirling Retreat
- Move: She will use this move if you have closed the gap on her considerably. She will twirl the staff and then levitate back.
- Counter: Just avoid the rotating staff.
Summon moves and attacks

Lone Wolves
- Moves: Will work a lot like your Lone Wolves Spirit Ash.
- Counter: They don’t stay for long. Avoid them and concentrate on Rennala.
Bloodhound Knight
- Moves: Will follow the same moves as a Bloodhound Knight.
- Counter: If you are confident you can try killing it to prevent it from being resummoned. But the best course of action will be to run away from it and focus on Rennala.
Troll Knight
- Move: Has the same movesets of a troll knight.
- Counter: Avoid ii and its attacks, and focus on Rennala. The troll does not stay on the field for long.
Dragon
- Move: The Dagon Spirit will primarily focus on breathing fire.
- Counter: Void the flame breath and the dragon altogether. Run past it and keep dealing damage o Rennala.
Rennala’s resistances and weaknesses in Elden Ring
Resistance:
Renala has good overall resistance to Magic, Holy, Fire, and Lightning. This is one of the reasons why mages will have a fair bit of trouble against her.
She also has the same resistance values to Poison, Scarlet Rot, Hemorrhage, and Frostbite. So you can try to exploit these status effects atleast once during the fight.
Rennala is immune to Sleep and Madness as well, so you will not be able to exploit these effects against her in any way.
Weaknesses:
Rennala takes more damage from slashing and piercing weapons. Hence armaments like katanas, spears, swords, and greatswords will work wonders against her. She also staggers pretty easily from heavier melee weapons.
Her poise can also very easily be broken with the use of jumping attacks and heavy attacks from heavier weapon. This will open her up to a riposte which will deal a significant chunk of her HP.
How to beat Rennala in Elden Ring
Rennala’s Phase One is pretty simple in Elden Ring. All you will need to do is to find the glowing scholars who are channeling her shield and kill them. There will be three of these scholars to look for, and they will die from just one or two hits.
Once the scholars are down, Rennala will crash on the floor giving you a lot of time to deplete her HP bar. Just rinse and repeat, and you will get to Phase Two in no time.
However, it’s in Phase Two when things get trickier with Rennal’s Summons and her high-damage spells.
General tips for beating Rennala
- Intelligence and Faith builds can try to negate Rennala’s Magic resistance by using incantations like the Rock Sling or weapons like the Carian Knight’s Sword or Moonveil as they do physical damage and scales with Faith or Int.
- Reserve all your Summons for Phase Two. Don’t waste your Spirit Ashes in Phase On.
- Always ait for Rennala to execute her heaviest hitting spells before going in. She often has a pretty big windup time and a recovery period.
Ranged Build tips for Rennala

Bow users will need to exploit the various status effects on her to do a lot of damage. So rely on Hemorrhage, Poison, and Frostbite to take her down.
Mages will struggle in Phase 2. So if you are leveling Intelligence and Fait look for alternatives like the Rock Sling, or Carian Knight’s Sword or Moonveil. While they scale with Faith and INtelligence, they do physical damage which Rennala has no resistance to.
If you’re looking to cast spells make sure you are doing it during Rennala’s recovery period. Along with having a long windup many of her spells like the Comet Azure and Full Moon have a high recovery period. These moments will give you enough time to channel your spells.
Melee Build tips for Rennala

Melee players will have a much easier time in this boss fight. Rennala is prone to stagger and you can oftentimes break her spell cast by just staggering her.
However, make sure you look out for her staff attacks which can catch you off guard. Avoid her Full Moon at all costs as well. It can do a devastating amount of damage and you can get one shot depending on your remaining HP.
During Comet Azuer circle in on her at a 45° angle, and get some hits in when she is recovering. With enough jumping and heavy attacks you will break her poise and leave her vulnerable to a Ripost.
When defeated Rennala will become an NPC that you can interact with to respec your character by using Larval Tears.